GREYCORTEX Mendel 5.0’s new Risk Score looks at host behavior over time and helps security analysts decide where to start an investigation.
The event with the highest severity may seem like the obvious choice, not necessarily the most important one. Two events with the same severity can have very different significance. One appears on many hosts in the same subnet, the other on only one. The second one stands out from the activity in the subnet, so it deserves a closer look. The Risk Score takes such differences into account and ranks hosts by how much attention they need.
In this deep dive, we look at what influences the score, what can push a host higher on the list, and how its history and trend support the decision.
What the Risk Score tells you
The Risk Score is a number that Mendel 5.0 assigns to each host, meaning any device that communicates on your network, such as a server, workstation, or printer. It is calculated from the security events recorded for that host and shows how much attention it needs.
Several elements help determine the Risk Score and how to interpret it:
- Uniqueness. An event affecting many hosts in the same subnet is less unusual than one affecting only a few. When an event stands out from the activity across the subnet, it gives the analyst a reason to look more closely at that host.
- Recency. Recent, significant activity has a stronger influence on the score than older activity. Older risk signals gradually lose weight, while the score is stored over time, allowing you to track whether a host’s risk is increasing, decreasing, or remaining stable.
- Frequency change. An event that normally appears once a day on a host but suddenly appears a hundred times a minute can move that host up the list.
Step-by-step investigation with the Risk Score
Hosts with a high score and a rising trend come first. The steps below show where to find them in Mendel and how to check what is behind the increase.
- Sort hosts by risk and read the trend. In the Events menu, open the Hosts by risk page. A host with a lower score but a sharp increase also deserves a look.

Check what the host is. Click the host in the list. The Host Dialog opens with the host’s details, risk history, and events. It also shows the host’s subnet, tags, and the services it uses. Tags describe its role, for example NTP client or DNS server. Each tag shows when its validity changed, so you can see the host’s role at the time of the activity. If Mendel has little information about the host, the Identify device role button gives an additional assessment.
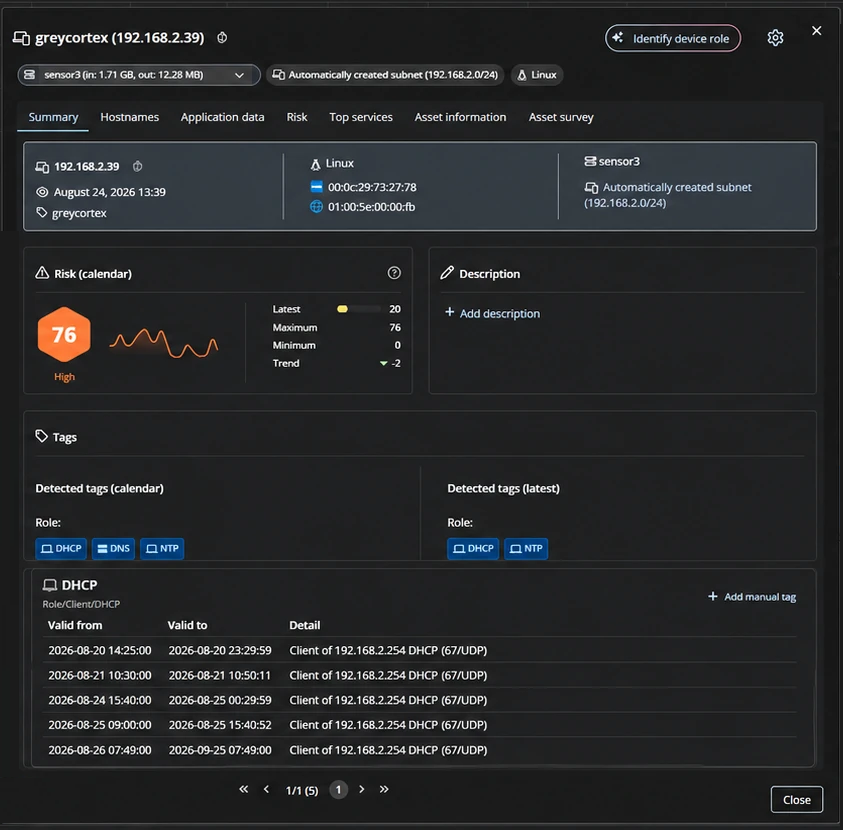
Find the largest increase in risk. In the Host Dialog, open the Risk tab. It shows the score over time and the events behind it. Note when the biggest increase happened and narrow the time range around it. The event list follows the selected range, so only the events from that period remain.
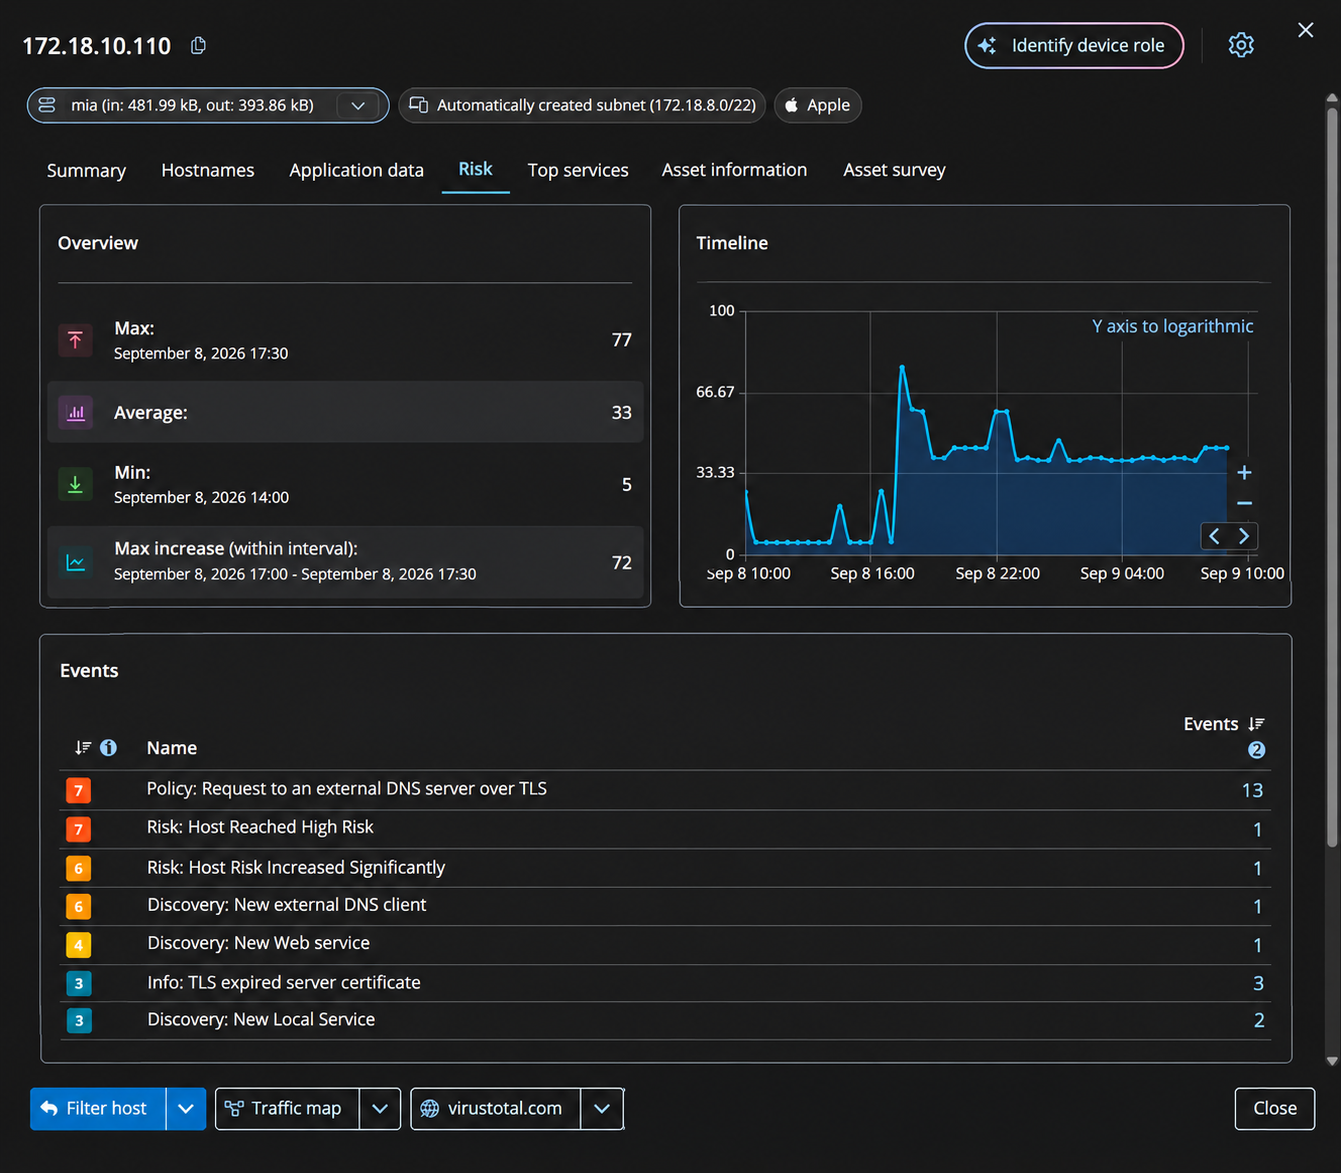
- Widen the time range if needed. To see whether the increase is part of a longer pattern, check how the risk developed over a longer period. Open the Traffic flow map. The Traffic flow map button at the bottom of the Host Dialog shows which other hosts this host communicates with.
- Open the Traffic flow map. The Traffic flow map button at the bottom of the Host Dialog shows which other hosts this host communicates with.


Alerting on risk events
Mendel creates an event when a host reaches a high risk level, and another when a host’s risk increases significantly. In the event list they appear as Risk: Host Reached High Risk and Risk: Host Risk Increased Significantly.
You can set up notifications on these events to learn when a host’s risk changes, instead of relying only on event severity.

From priority to context
Mendel 5.0’s Risk Score gives you a way to prioritize hosts based on their risk and how that risk is changing. The redesigned Host Dialog then adds the context needed to understand the host and investigate what happened. The result is a more focused starting point for network investigations: identify where the risk deserves attention, understand the host behind it, and then follow the activity that matters.
Want to see the full investigation workflow in Mendel 5.0?
Get the recording →
Categories
- Company News (38)
- Product News (29)
- IT/OT Security (42)
- Webinars (6)